Rusty Metal: A 3D Modeling Tutorial
In my last blog post, I showcased a creature model wearing rusty metal armor. In the process of texturing the model, I figured out a few techniques for achieving the surface look that I wanted. In this blog post, I explain the process of creating the rusty metal look.
This tutorial assumes that you have the following software:
The tutorial also assumes that you already know the basics of normal and diffuse mapping and that the model you’re working on already has a UV map in place. The tutorial also assumes that you know how to use your software. I won’t explain how to create alpha channels or how to set overlay layers.
When you’re ready, do the following steps.
This tutorial assumes that you have the following software:
- An image editor that can handle layers and channels such as Photoshop or Gimp as well as a plugin for converting image files to normal maps. I use Photoshop, but the operations explained here can also be done in Gimp, albeit with different commands.
- 3D Modeling software that can import and export MDB files such as 3DS Max with Tazpn’s MDB plugin
The tutorial also assumes that you already know the basics of normal and diffuse mapping and that the model you’re working on already has a UV map in place. The tutorial also assumes that you know how to use your software. I won’t explain how to create alpha channels or how to set overlay layers.
When you’re ready, do the following steps.
 Create a normal texture representing the embossed and engraved patterns on the surface of your model. Note that the surface marks due to rusty metal are not yet accounted for in this normal texture. We’ll include those later.
 - Download or create a rusty metal texture. Some excellent textures are available for download if you search well enough. Before using downloaded textures, make sure that you’re allowed to use it for whatever purpose you intend. Some textures are available for non-commercial use only, which is fine if you’re modding NWN2. Other sites may not be as generous regarding their terms of use.
 In your image editing software, tile your chosen texture so that the image is the desired size of your diffuse map. If these tiles are created from separate layers, merge them to form a single rusty metal layer.
- At this point, the diffuse map covers the entire model with a rusty metal texture. If there are other areas of your model that use different textures, create a new layer over the metal layer for each additional texture that your model needs and paint over them.
 For the texture I’m making, the new texture layer appears as shown here. Note that all areas not covered by the texture are transparent (which, in Photoshop, is indicated by a gray-and-white checker pattern).
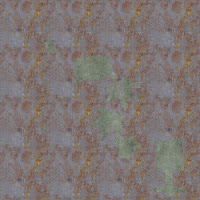 When both layers are visible, the resulting image appears as shown here.
We’re done with the diffuse map. You may now save it as a TGA or DDS file. (DDS files are smaller and should generally be the format of choice for your texture files.) You’ll have to refer to your original file with its separate metal layer as well, so you may want to save it in the native format of your image editing software just to be safe.  From your original diffuse map file, duplicate the rusty metal layer to a new window. Now create a normal texture out of this image. This normal texture will show as pits, scars, and surface bumps on the metal surface. Rather than explaining how to do this, I’d like to refer the reader to this excellent tutorial. Continue to the next step when you’re done.
 Copy the new normal texture as a layer over the first normal texture that you created in Step 1. Set this layer as an Overlay layer so that the rusty metal surface is added to the design pattern of the first normal texture. Note that you may have to erase parts of the overlay layer that cover areas that are not of rusty metal.
- If the normal texture does not already have an alpha channel, create one. The alpha channel of a normal map controls how much light is reflected from each area of the model. White areas on the alpha channel reflect the most light in the corresponding surface of the model, and black areas on the alpha channel reflect the least light. How much light the shades of gray on the alpha channel will reflect depends on how dark they are. On the alpha channel, we want the rusty parts of the metal surface to be black and the non-corroded parts of the metal to be white. The non-metallic portions of the model may be represented by black, white, or shades of gray on the alpha channel depending on the type of material they are supposed to be made of.
Don’t even think of painting the alpha channel by hand. The rusty texture is much too complex for that. Do the following steps instead to paint your alpha channel.  From your original diffuse map file, duplicate the rusty metal layer to a separate window just as you did in Step 6. With the new window active, click the Channels tab at the right side of the screen. Select the Blue channel and copy the grayscale image to a new window.
We choose the Blue channel because of the different color qualities of sheet iron and rust. Sheet iron that has not corroded is grayish, which means that it has a relatively even mix of red, green, and blue light. Rust, on the other hand, is orange, with variations across the range of red to yellow. Everyone knows that red and yellow, when mixed together, make orange. Not as many people realize that when you mix red and green light together, you get yellow. (Mixing red and green pigment, not light, results in a grayish color, but that’s neither here nor there.) In the blue channel, everything bluish appears lighter and everything with a predominance of red or green appears darker. Hence, in the Blue channel, rust will appear darker than iron that hasn’t corroded.
What we want to do now is to darken the rusty areas to almost pure black and lighten the non-rusty areas to almost pure white. With the newest window active, duplicate the layer that has the grayscale image. Set the upper layer as an Overlay layer. Duplicate this Overlay layer several times to sharpen the contrast of the image. (In my case, I created nine copies of the overlay layer before deciding to stop.) Merge all the layers together.
 Adjust the image’s brightness and contrast by cranking both as high as you can.
 Add another layer on top of the image and paint over it so that the non-metallic sections of the normal map are represented. Whether to paint those sections black, white, or some shade of gray will depend on how much light you want to reflect off the non-metallic sections.
Merge all layers when you are done.- Copy the entire image to the alpha channel of your normal map. Save the resulting image as a TGA or DDS file (preferably the latter).
 Open your model in 3DS Max and access the Material Editor. If you haven’t set the normal and diffuse map of your model as a material, do so now. Make sure that this material is currently selected.
Under “Blinn Basic Parameters,” set the Specular Level to a value between 40 and 50 inclusive. This will set a fairly strong highlight on the model. Set the Glossiness value to 100. This will concentrate the highlights over smaller areas of the model, which is good for simulating metallic shine. Assign the material to your model and export everything as an MDB file.- Put your MDB and DDS or TGA files in your Neverwinter Nights 2 override folder. You may have to copy the Appearance.2DA file to the override folder and edit it to include your creature model. You may now view your creature model in the toolset or in the game. If all goes well, the rusty metal on your model should look fairly realistic.


Comments