My First Placeable Model
I assume that most people who try to learn 3D modeling start with something inanimate such as a box. My first 3D model, on the other hand, was a monster. I could never focus my attention on anything as banal as a box, so I jumped right into creature modeling. Took me over a month to figure out.
For Shattered Dreams, Dirtywick told me that he needed a custom model – something like a tripod, a little taller than a human, topped with a crystal. Since all the other 3D artists on the project were still busy with their current assignments, I decided to try making my very first placeable.
Looking for picture references on which to base my design, I searched the Internet for tripods, preferably those that looked arcane, but the ones I found were either too plain or too modern. I eventually decided to search for candleholders because some of them can be pretty fancy, and their design can conceivably be tweaked for holding crystals instead. It didn’t take me long to find some beautiful ones. The ones I liked were small metal sculptures of women lifting up receptacles into which candles may be placed. Some of those receptacles were shaped like flowers. (Hmm, candles inserted into flowers held by women – could there be something Freudian going on with those designs?)
I liked the idea of making the crystal holder a sculpture of a woman, a fierce but beautiful one caparisoned for war. Because I was running short on time, I decided to forego producing concept art and just create a 3D model on the fly. I thought of making the woman a warrior wizard of some sort, so I had her dressed in a robe. With her hairstyle, however, she looked like a school teacher from the 19th century, so I gave her a breastplate to wear over her clothing. I then decided that the long sleeves weren’t sexy, so I sculpted away the sleeves. That left her arms looking too bare, so I added a pair of bracers.
With all the tweaking I did on the model, maybe I should have drawn some concept art first.
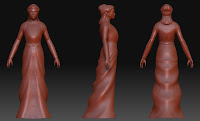 From the beginning, I had planned on posing the high and low poly models symmetrically. I intended to adjust the pose of the low poly model after creating its UV, diffuse, and normal maps. That way, I could create a mirrored UV map without much difficulty. If I had set an asymmetrical pose on the model at the start, producing a mirrored UV map would have been impossible. It was a brilliant plan, I thought to myself.
UV mapping was a breeze. So was texturing. The next task was to pose the model. In ZBrush, I masked off all but the model’s right arm and attempted to rotate it into position. The arm and shoulder twisted out of shape. I adjusted the masking and tried again. Portions of the model’s back collapsed in an inhuman manner. Try as I might, I could not get the arm to rotate convincingly at the shoulder socket.
Yeah, brilliant plan, I thought to myself.
Since that didn’t work out well, I decided to return to my modeling roots and rig the whole mesh in 3DS Max as if it were character model. I then moved and rotated the bones to get the model into the pose that I wanted. Because my rigging was hastily done, a number of vertices wound up a little off position, so I tweaked them into place in ZBrush.
As can be seen from the in-game screenshot below, the model didn’t turn out so badly after all.


Comments
Great work!
Lance.
Ha ha, I've never played Zork Nemesis, but your description is giving me ideas.
@Lance,
Thanks, man. :)