Creature Modeling, Part 7: The Road to Completion
This is the conclusion of my series on building creature models for NWN2. Those who haven’t read the start of the series may want to refer to my previous blog posts.
We’re almost done with our creature model, but not quite. There are still some issues to tackle, which we shall discuss in this write-up.
Level of Detail
You may recall that in Part 3 of this series, I mentioned that the MDB file we’ve been editing contains not one but three ghoul heads. We’ve been working on the main mesh, but there are two other meshes with fewer polygons. When the creature is shown in the game, the mesh that is used depends on the distance of the creature to the screen. Up close, the mesh with the most polygons is displayed, but as the creature’s distance to the screen increases, the mesh is substituted for one with fewer polygons.
In NWN2, 3D models have at most three levels of detail (or LOD for short). The mesh with the most polygons has the same name as the MDB file. The one with fewer polygons has “_L01” appended to the model name, and the mesh with the fewest polygons, “_L02.” The last two meshes need not be in the MDB file, but having them will help the engine run more smoothly by decreasing the polygons to be rendered when the model is zoomed out.
Below are the steps to follow in creating the lower LOD meshes.
Body Building in Brief
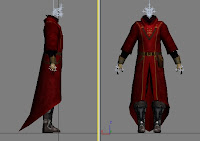 I won’t go into detail on how I created this creature’s body. Suffice it to say that I built it out of spare parts; namely, the red wizard robe, the elven boots, and the ghoul’s hands, all of which are available in the toolset with the MotB expansion. Since both the ghoul’s body and the red wizard robe have their own set of collision spheres, I had to delete the ones that come with the red wizard robe. I sliced the hands off the ghoul using a couple of Slice modifiers, one for each hand. I then joined the individual parts together by dropping an “Edit Mesh” modifier on the stack of one of the meshes and clicking the modifier’s “Attach List” button
I also applied a process that is similar to much of what I have written in this series of blog posts. With this information on hand, it probably wouldn’t be difficult for a novice modeler to figure out how I constructed the creature’s body.
New Creature Entry
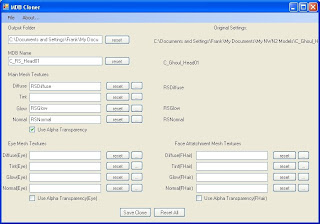
We hijacked the ghoul’s slot in the toolset as a quick way to test our model. Unless we give the new creature its own slot, however, we won’t be able to have both the ghoul and the new creature in the same module. Hence, we’ll have to rename the creature’s MDB files. This can be done in 3DS Max, but the process is much faster and less prone to error when using RunnerDuck’s MDB Cloner. We’ll follow the convention of naming monster heads C_name_Headnn, where name is the name (whether abbreviated or not) of the creature, and nn is a number from 01 to 99. For the monster’s body, the convention is C_name_CL_Bodynn. (“CL” in this case stands for “cloth,” which means that the creature is not armored.)
The last step is to copy the file appearance.2DA to your NWN2 override folder. You should then edit it to add a new entry for the creature you’ve just created. As I mentioned before, I prefer using Excel to edit 2DA files, although there are a number of free 2DA editors that you may download from the Vault.

If you need more information on the 2DA file format, you may refer to this document. If you want information specific to appearance.2da, you may want to read my blog post on it.
Last Remarks
This ends my tutorial on building creature models. Although there is still much to learn on this topic, I believe I've covered enough information to show how to construct models from scratch. Considering that the Vault isn’t exactly teeming with creatures for NWN2, perhaps the information herein will help would-be modelers increase the Vault's offerings.
We’re almost done with our creature model, but not quite. There are still some issues to tackle, which we shall discuss in this write-up.
Level of Detail
You may recall that in Part 3 of this series, I mentioned that the MDB file we’ve been editing contains not one but three ghoul heads. We’ve been working on the main mesh, but there are two other meshes with fewer polygons. When the creature is shown in the game, the mesh that is used depends on the distance of the creature to the screen. Up close, the mesh with the most polygons is displayed, but as the creature’s distance to the screen increases, the mesh is substituted for one with fewer polygons.
In NWN2, 3D models have at most three levels of detail (or LOD for short). The mesh with the most polygons has the same name as the MDB file. The one with fewer polygons has “_L01” appended to the model name, and the mesh with the fewest polygons, “_L02.” The last two meshes need not be in the MDB file, but having them will help the engine run more smoothly by decreasing the polygons to be rendered when the model is zoomed out.
Below are the steps to follow in creating the lower LOD meshes.
- Load your model in 3DS Max and click the “Display” tab at the right side of the screen. (It’s the one with the tiny icon of a computer monitor on it.) Under the “Hide” rollout, click the “Unhide by Name…” button. This will bring up the “Unhide Objects” screen. Click the two lower LOD meshes while holding down the [Ctrl] key to select them both then click the “Unhide” button. We’re going to replace these meshes, so select each in turn and press the [Delete] key. The only remaining mesh should be the one with the highest polygon count.

- Click the remaining mesh to select it. Go to the File menu and click the “Export Selected…” option. (Don’t click “Export…” since you’ll want to export only the selected mesh.) Export the mesh as an MDB file. Next, click the File menu again and select “Import…” This will bring up the “Select File to Import” window. From there, select the file name of the mesh you had just exported then click the “Open” button. When the “Import Name Conflict” dialog box appears, edit the text in the “New Name” textbox so that it will be the same as the name of the original mesh but with the characters “_L01” appended to it.

 The newly imported mesh has its UVW mapping already embedded in it. The “Unwrap UVW” modifier, as well as most other modifiers that are on the original mesh, are gone, their effects having already been incorporated into the new mesh. In fact, the mesh comes with just a Skin modifier on top of it, which we will now delete.
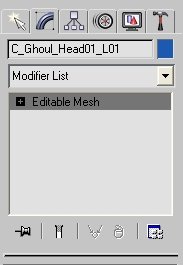
Select the newly imported mesh and click the “Modifier” tab to display the Modifier panel. Right-click the “Skin” modifier and click the “Delete” option from the context-sensitive menu so that only the “Editable Mesh” modifier remains.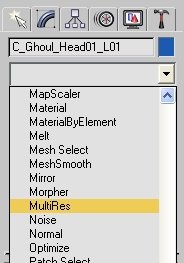 Click the button with the downward-pointing arrowhead above the modifier stack and click “MultiRes” from the dropdown list. This will add the MultiRes modifier to the stack.
  In the “MultiRes Parameters” rollout, click the “Generate” button. Next, enter a lower figure in either the “Vert Percent” box or the “Vert Count” box. If there is no checkmark in the box beside “Vertex Merging,” click the box to put a checkmark in it. Click the “Generate” button again. This will decrease the number of vertices in the mesh to your approximate target value.
Note that while automated vertex merging reduces the tedium of creating lower LOD meshes, the results are not always satisfactory. It’s possible to manually merge vertices at some point, but it’s up to you to determine when to stop merging vertices automatically and when to do it manually. It’s also up to you to decide which vertices to merge together.
When you’re satisfied with the results, you may add a Smooth modifier on the stack so that the mesh won’t look too blocky.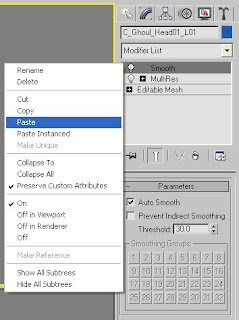 Add the bones that the mesh will need. For head models such as this one, the lower LOD mesh may need only three bones, so it’s a simple matter of adding them one by one. Body and armor LOD meshes typically have the same number of bones as the original mesh, however.
In case the lower LOD mesh needs the same bones as the original mesh, there’s an easy way to copy all the bones at once. This method was described by one of the artists at Obsidian Entertainment and posted by Rob McGinnis at this thread in the NWN2 forums:
Select the original mesh and right-click its Skin modifier in the modifier stack. Click the “Copy” option in the context-sensitive menu that appears. Select the lower LOD mesh then right-click the modifier stack and click the “Paste” command from the context-sensitive menu. This will add a new Skin modifier on the stack, complete with the same set of bones found in the original mesh.- Set the bone weights at each vertex for each bone. If there are only a few bones in the mesh, this can be done using the techniques I described in an earlier blog post. Nevertheless, if there are many bones attached to the mesh, you’ll want a faster way to rig the whole thing. In the same thread cited above, Rob McGinnis showed a technique that will allow us to copy bone weights from the original mesh to the lower LOD mesh. This technique is described below.
Select the original mesh then click the “Utilities” tab in the right side of the screen to bring up the Utilities panel. (It’s the tab with the tiny hammer icon.) Under the “Utilities” rollout, click the “More…” button. This will bring up the “Utilities” dialog box. Scroll down the list box on the left of this window and click “SkinUtilities.” Click the “OK” button to close this window. Notice that a new rollout called “Parameters” appears in the Utilities panel.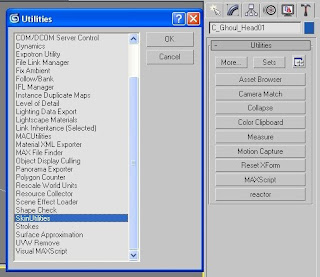
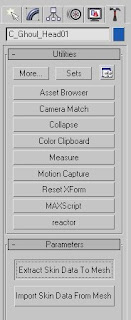 With the original mesh still selected, click the “Extract Skin Data To Mesh” button under the “Parameters” rollout. This will create a new mesh that has the same name as the original but with the prefix “SkinData_” preceding it. Let’s call this the “skin data” mesh. Select both the skin data mesh and the lower LOD mesh together then click the “Import Skin Data From Mesh” button under the “Parameters” rollout. A new dialog box called “Paste Skin Data” will appear.
Click the “Match by Name” button in the new dialog box then click the “OK” button. Finally, select the skin data mesh and delete it.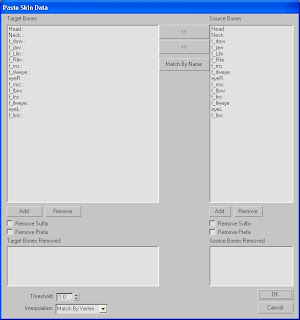
This process is a quick way to get weight vertices on the first pass, but it isn’t guaranteed to be perfect. You may have to tweak some of the bone weights manually, but the tedium of weighting all vertices from scratch is done away with. - Repeat steps 2 to 6 above for the “_L02” mesh, which should have fewer polygons than the “_L01” mesh.


Body Building in Brief
 I won’t go into detail on how I created this creature’s body. Suffice it to say that I built it out of spare parts; namely, the red wizard robe, the elven boots, and the ghoul’s hands, all of which are available in the toolset with the MotB expansion. Since both the ghoul’s body and the red wizard robe have their own set of collision spheres, I had to delete the ones that come with the red wizard robe. I sliced the hands off the ghoul using a couple of Slice modifiers, one for each hand. I then joined the individual parts together by dropping an “Edit Mesh” modifier on the stack of one of the meshes and clicking the modifier’s “Attach List” button
I also applied a process that is similar to much of what I have written in this series of blog posts. With this information on hand, it probably wouldn’t be difficult for a novice modeler to figure out how I constructed the creature’s body.
New Creature Entry
We hijacked the ghoul’s slot in the toolset as a quick way to test our model. Unless we give the new creature its own slot, however, we won’t be able to have both the ghoul and the new creature in the same module. Hence, we’ll have to rename the creature’s MDB files. This can be done in 3DS Max, but the process is much faster and less prone to error when using RunnerDuck’s MDB Cloner. We’ll follow the convention of naming monster heads C_name_Headnn, where name is the name (whether abbreviated or not) of the creature, and nn is a number from 01 to 99. For the monster’s body, the convention is C_name_CL_Bodynn. (“CL” in this case stands for “cloth,” which means that the creature is not armored.)

The last step is to copy the file appearance.2DA to your NWN2 override folder. You should then edit it to add a new entry for the creature you’ve just created. As I mentioned before, I prefer using Excel to edit 2DA files, although there are a number of free 2DA editors that you may download from the Vault.

If you need more information on the 2DA file format, you may refer to this document. If you want information specific to appearance.2da, you may want to read my blog post on it.
Last Remarks
This ends my tutorial on building creature models. Although there is still much to learn on this topic, I believe I've covered enough information to show how to construct models from scratch. Considering that the Vault isn’t exactly teeming with creatures for NWN2, perhaps the information herein will help would-be modelers increase the Vault's offerings.


Comments
Hope this tut helps many people out there and release more CC
Congrats