Creature Modeling, Part 1: Sculpting a High-Poly Monster Head
“He who teaches himself hath a fool for a teacher.”
– Ben Franklin
This blog post is the first in a series on building creature models for use with Neverwinter Nights 2. I suppose one could call this a tutorial, but I hesitate to dub it as such. I’m really just a noob at 3D modeling for NWN2, and my workflow isn’t particularly efficient. I’m sure there are others who know more about this topic than I, but to the best of my knowledge, none of them have written any complete and detailed tutorials.
How I got into 3D modeling is a story in itself. Because the upcoming module from bouncyRock Entertainment will require new creature models, I volunteered to make them. Ideally, Jonny Ree would have built them for us, but he’s currently busy with other projects. We do have other 3D artists on the team, but none of them make creature models. I managed to convince Dirtywick, our project leader, that I could build them despite never having created any kind of 3D model from scratch before. Lack of experience has never stopped me from doing any modding-related work. I figured that if I could compose music despite having no prior experience at it, building creature models ought to be a cinch.
For over a month, I scoured websites and conducted a series of failed experiments to learn the secrets of creature modeling. Progress came slowly but surely. I knew I was on the right track when I managed to get the creature’s head to appear in the toolset. Eventually, I got the creature’s body to appear as well. When I had the creature fighting in game, I was certain that my knowledge was adequate at the very least. I decided to document my process lest I forget what I had learned. Perhaps others may benefit from this write-up and populate the Neverwinter Vault with new and exciting creatures. Here’s hoping that they do.
Requirements
Those who intend to build creature models for NWN2 will need the following:
- Neverwinter Nights 2 (of course)
- 3DS Max version 4.2, 5, 6, 7, 8, 9, 2008, or 2009. I use version 8.
- 3ds Max MDB Importer/Exporter by tazpn. I understand that only version 1.17 is good for creating skin meshes and that later versions can’t do it for some reason. (See what barrelofmonkeyzz has to say about this.) Version 1.17 of this plugin is no longer available at the Vault, however, so perhaps version 1.19 might do the trick. I really wouldn’t know because I have version 1.17 in my computer.
- RunnerDuck’s MDB Cloner
- Optional: A more user-friendly modeling software such as ZBrush. To be honest, I haven’t really learned how to create models in 3DS Max yet. I prefer sculpting in ZBrush, which feels more natural to me.
- Image editing software that can handle layers. I use Photoshop, but hobbyists on a budget may want to look into Gimp, which costs absolutely nothing.
- Software for converting image files to DDS format. If you use Photoshop, you can download and install nVidia's Photoshop plug-in. If Gimp is your image editor of choice, there is a DDS plug-in that you may download and install. Otherwise, you can use the stand-alone program DDS Converter instead.
- Artistic talent. You should be skilled enough to draw people and animals realistically. If you can sculpt people and animals in clay, so much the better. You will also need the ability to create meshes in your favorite modeling software, whether it be 3DS Max, ZBrush, or something else. This write-up will gloss over the details of my actual sculpting process.
Character Design
 The first thing we did was to design the creature’s look. Dirtywick and I drew a few crude sketches and passed them to each other over Skype. I initially thought of making the creature look something like a wraith, but Dirtywick’s idea was to make it look more like an axe murderer with gashes across its body. Eventually, I came up with a rough painting that met with Dirtywick’s approval.
At this point, we should have had several detailed paintings that show how the creature looks from various angles. The depiction of the creature should be well-lit, not shadowy, so that all the details that the 3D modeler needs would be plainly discernable. This was the point when I started wishing we had a dedicated concept artist who could paint these designs for us. Although I have some skill in the visual arts, it takes me a long time to come up with anything detailed. Besides, it would have been better if we had a concept artist who was much more skilled than I. To save time, I decided to do without the detailed paintings. Being the scripting manager as well as one of the writers and artists in the group, I find that time is a limited and precious resource.
Sculpting with ZBrush
Using ZBrush, I created a high-polygon model of the creature’s head by following the steps outlined below:
- Load the PolySphere tool by clicking the “Load Tool” button, selecting PolySphere.ZTL from the dialog window, and clicking the “Open” button.

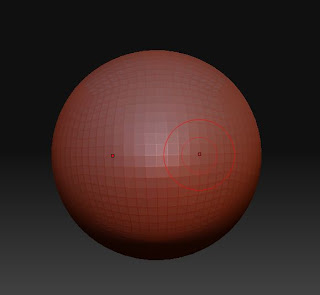
- Draw the sphere by left-clicking at the center of the drawing window and dragging the mouse cursor toward the bottom of the window.

- Go into Edit mode by clicking the “Edit” button at the upper left of the screen.

- Work on a lower-polygon version of the sphere by clicking the “Geometry” rollout to expand it and setting the SDiv (i.e., subdivision) level to 1. Alternatively, you can press [Shift+D] three times.

- Make sure that when you edit one side of the sphere, the opposite side gets edited as well. If you hover your mouse button over one side of the sphere, you should see a red dot over both the left and right side of the mesh. The [X] key toggles left-right symmetry, so if you see only one red dot, hit the [X] key.
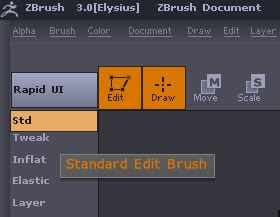
- We’ll want to shape the sphere into something that looks roughly head-shaped, so click the “Tweak” button at the upper-left side of the screen.

- Because we want to affect large parts of the sphere, set the Draw Size of the tweak brush to 256.

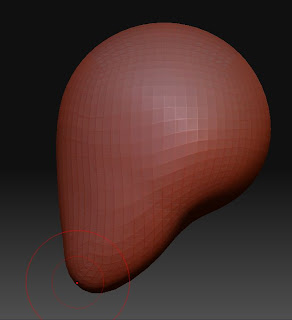
- Position the mouse cursor at the bottom-right side of the sphere. (You should see a red dot at both the bottom-left and bottom-right of the sphere.) Now elongate the sphere by clicking-and-dragging the mouse downward and toward the center of the sphere. Flatten the upper sides of the mesh a bit by positioning the mouse cursor there (either left or right side) and click-and-drag it slightly toward the opposite side. You should have something that now looks roughly head-shaped.

- Shift to a side view of the mesh. To do this, position the mouse cursor outside and to the right of the shape then click-and-drag the mouse until you get a nice side view. Tweak the mesh by bringing the chin portion forward a bit and raising the bottom of the cranium somewhat. You’ll want to decrease the size of the brush when working on the chin.
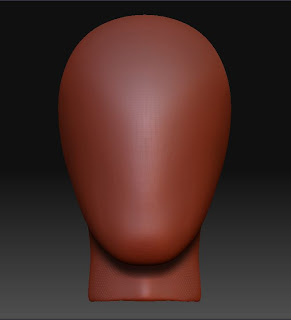
- Extend the bottom portion of the cranium to form a neck. You’ll need to adjust the size of the brush several times to shape the neck properly. You’ll also have to shift the angle of the model to tweak it from different sides.

- Raise the subdivision level of the model by pressing [D] three times. This will allow us to work with more polygons. If you need more polygons, press [Ctrl+D] to subdivide the mesh further.
- Select the standard edit brush by clicking the “Std” button. We’ll be using this brush from here on.
- Now shape the mesh as if it were clay. Clicking-and-dragging the brush over the model will raise the affected areas. Pressing the [Shift] key while clicking-and-dragging will create depressions in the mesh. You’ll want to adjust the size of the brush several times to affect smaller or larger areas as the need arises. Keep doing this until the model looks sort of like the character design depicted earlier.

- Save your model by clicking the “Export” button. Enter an appropriate file name then click the “Save” button. If you wish, you may set your model to a slightly lower subdivision level before exporting it. I chose to set the subdivision level of my model to 3. At this level, there are fewer polygons to contend with while retaining a fairly high level of detail.


With so many polygons, the resulting mesh won’t be useable in game. We’ll need to create a lower-poly model if we hope to see it in an NWN2 module. That will be the topic of my next blog post in this series.


Comments