Converting Skyrim Armor to NWN2, Part 1

Conversion Problems
Converting model files between video games is not without its problems, especially if the games are very different from each other. For example, it is possible to convert NWN models to NWN2 models, but the results often look crude and blocky. Likewise, converting Skyrim models to NWN2 models may be problematic for two reasons.Firstly, Skyrim armor has way more polygons than are recommended for NWN2, which is still slow compared to newer games nowadays. I would recommend lowering the poly count of the armor at some point before rigging it to the NWN2 skeleton, but I won’t show how to do it in this tutorial. Lowering the poly count of a mesh is something of an art in itself, one that can be more difficult to accomplish than building a mesh from scratch. Please keep this caveat in mind. If your NWN2 game seems slower whenever your character wears Skyrim armor, you’ll know why.
Secondly, Skyrim's normal maps are very different from those of most games. NWN2 uses tangent space normal maps, which generally have a light violet hue and a limited color range that goes between turquoise and magenta. Below is an example of a tangent space normal map, which I got from NWN2.

Most 3D games use tangent space normal maps for their models. From what I understand, you can deform (i.e., animate) objects that use tangent space normal maps and still preserve their surface appearance. If you deform a mesh that uses object space normal maps, it won't look right.
That was my understanding thus far. Imagine my surprise when I opened a normal map from Skyrim and found this:

The addition of orange and green hues clearly indicates that the above is an object space normal map. Supposedly, models that use normal maps of this type are faster to render, but they can't be deformed without making the model look bad. Yet, lo and behold, this normal map is for a female head, which deforms every time it talks, blinks, or furrows its brow. How is this possible? It seems that the game programmers at Bethesda have uncovered some dark sorcery that allows them to use object space normal maps on animated meshes.
As far as I know, it is not possible to convert object space normal maps to tangent space normal maps. If the model you want to convert uses object space normal maps, your only option is to make a tangent space normal map from scratch, even if it is just a uniform light violet color all throughout.
For this tutorial, I downloaded an armor model that fortunately uses tangent space normal maps. It was actually converted from The Witcher 2, which is why its normal map is like that of most other games.
If you’re still with me, then read on.
Legal Considerations
Before we continue, I’d like to say a few words about some important legal issues so that no one can reasonably accuse me of encouraging copyright infringement.In general, you must never upload or distribute any model that was originally created by anyone other than yourself without getting the permission of whoever created it. There are exceptions of course, depending on what permissions the original creators granted to those who acquire their work. Unless they explicitly state otherwise, you must assume that their permission will always be required.
For this tutorial, I’m using a mod called Triss Armor Re-textured by Psyke23 and oldholo, who converted the clothing worn by Triss Merigold in The Witcher 2. The developers of The Witcher games, CD Projekt, generously granted permission for Triss Merigold’s armor to be adapted for use in Skyrim. They granted me no such permission, however, and neither did Psyke23 or oldholo. That’s because I didn’t ask for it since I’m only using this armor for illustration purposes. I will not upload the converted armor to any website unless the creators of the armor allow me. If you want your own Triss armor in NWN2, your best bet is to follow my tutorial.
Requirements
For this tutorial, you will need the following.- Skyrim and Neverwinter Nights 2, of course.
- Image editing software such as Photoshop or Gimp. We’ll need it to edit the texture files of the model.
- 3DS Max version 5, 6, 7, 8, 9, 2008, or 2009.
- The version of tazpn’s 3ds Max MDB Importer/Exporter plugin that is appropriate for your 3DS Max installation. We’ll need this to import and export NWN2 models.
- The NifTools plugin that is appropriate for your version of 3DS Max. This will allow us to import models that are saved as NIF files. NifTools 3.4, the latest version as of this writing, cannot read Skyrim models directly. We’ll need a tool to convert it into a format that NifTools can read, which brings us to our next requirement.
- NifSkope, a tool that you can use for loading, editing, and exporting models that use the NIF format. You can run it from your hard drive without having to install it. We’ll need this software to convert Skyrim models into a format that NifTools can read.
- The FO3 Archive Utility, an extraction tool for BSA files. BSA stands for Bethesda Softworks Archive, which is a file that contains other data files for Bethesda's games. We will need this utility to extract the skeleton that Skyrim characters use. (FO3 actually stands for Fallout 3, but this program can read Skyrim BSA files as well.)
- Any armor provided by Skyrim modders that you want to convert to NWN2. There are a number that you can download at the Skyrim Nexus and the Steam Workshop. For this tutorial, I’m using the Triss Armor Re-textured mod.
- If parts of the armor you downloaded show some skin, such as just below the neck or portions of the arms or legs, you will need a nude NWN2 model to replace the Skyrim body with. Recall that because Skyrim models use object space normal maps, we can't use them in NWN2. If you need a nude base, I recommend downloading the Skins for All Races mod by Casa and Jester_v01.
- If the nude base you downloaded comes in a hak pak, you will need an application for extracting its contents. I use tani's NWN2Packer, but you may want to check out Ladydesire's Tool Pack as well.
Tutorial
- Go to the Data folder of your NWN2 installation.

Open NWN2_Models.zip and copy the MDB files of any one of the human female bodies, heads, gloves and boots to another folder, which will henceforth be your working folder. There are several MDB files that you can choose from. The picture below shows which ones I settled on.

- Download the Triss armor if you haven’t done so yet, and extract the file’s contents to your chosen folder.
- Run the FO3 Archive Utility by double-clicking its program shortcut, which is shown below.

Under the File menu, click "Open Archive." In the dialog box that appears, navigate to the Data folder of your Skyrim application. If you’re running Windows XP like I am, the folder would be in C:\Program Files\Steam\steamapps\common\skyrim\Data. Select the file named "Skyrim - Meshes.bsa" then click the Open button.

It may take a while for the utility to read the BSA file, so you may have to sit back and wait for it to finish.
- At this point, you will see a hierarchy of folders and files displayed in the FO3 Utility. We’re going to look for the skeleton file that controls the armor we're working on. In the FO3 Archive Utility window, expand the "meshes" folder by clicking the [+] sign next to it. Under the "meshes" folder, expand the "actors" folder, then the "character" folder. If the armor that we want to use is for male characters, expand the "character assets" folder. If the armor is for female characters, as is the case with the Triss armor, expand the "character assets female" folder. Next, click the appropriate skeleton for use with our armor. The skeleton for human and elven males is named skeleton.nif, whereas that of argonian and khajit males is skeletonbeast.nif. Human and elven females use skeleton_female.nif, and their argonian and khajit counterparts use skeletonbeast_female.nif. For the Triss armor, we will need the human female skeleton, so that is what we select.

- Under the Action menu, click "Extract Selected Files." In the dialog box named "Select Destination Directory," navigate to where you want to extract the skeleton file then click the Select button. As shown in the picture below, I chose to extract the skeleton in one of the subfolders of my Triss armor folder.

Having done this, we may now exit the FO3 Archive Utility. - Run NifSkope and click [Ctrl]+O to load the vanilla version of the slim torso. In the case of the Triss armor, this is the file torso_f_0.nif. You may find it in the folder to which you extracted the Triss armor files, under the subfolder TrissArmorRetextured\body\vanilla\. Other armor mods may have different names for the torso mesh. The slim version of the armor will always have the suffix “_0,” and the heavy version will have the suffix “_1.” For NWN2, choose the slim version over the heavy version.

- Under the bottom panel labeled Block Details, expand the NiHeader property. You will see that User Version is set to 12. Double-click the number and change it to 11.

User Version is set to 12 by default.

Double-click the value of User Version and change it to 11.
You will also see that User Version 2 is set to 83. Double-click that number and change it to 34.

User Version 2 is set to 83 by default.

Double-click the value of User Version 2 and change it to 34.
- Under the left panel labeled Block List, expand “0 NiNode.” Expand the first NiTriShape node that you see. Under it, you will find a property named BSLightingShaderProperty. Click it then press [Ctrl]+[Del] to delete it.

Repeat this step for all other NiTriShape nodes in the file.

- Click the File menu and select “Save As…” (Alternatively, you may press [Ctrl]+S.)

Save the torso file under a new name.

- Repeat steps 6 to 9 above for the boots and gauntlets. Remember to always choose the slim version over the heavy version of each model.

In case you’re wondering where the gauntlets of the Triss armor are, they are in the subfolder TrissArmorRetextured\data\meshes\armor\psyold\triss. -
We will now load the skeleton file that we extracted earlier and modify it similarly to what we did for the armor meshes. Press [Ctrl]+O then navigate to the folder where you extracted the skeleton file. There, you will find a folder named “meshes.” Double-click it, then double-click the “actors” folder, the “character folder,” then finally the “character assets female” folder. (If it was a male skeleton that you extracted, the last folder would be named “character assets.”) Select the skeleton file then click the Open button.

-
Like before, under Block Details, expand the NiHeader property then set
“User Version” to 11 and
“User Version 2” to 34.
Under Block List, expand “0 BSFadeNode” then select “1 BSBoneLODExtraData.” Press [Ctrl]+[Del] to delete this node.

- Press [Ctrl]+S and save the skeleton as a new file. When you’re done, you may quit NifScope.

- Run 3DS Max and import the NWN2 PC female body, boots, gloves, and head, preferably in that order.

In case of an Import Name Conflict, just click the OK button.

- Select the collision sphere for the head and delete it. We won’t need it anymore.

- Press [H] to bring up the “Select Objects” dialog box and select all but the main meshes of the body, boots, gloves, eyes, and head. Click the Select button to close the dialog box and select these objects.

Right-click anywhere on the window to bring up a context-sensitive menu and click “Hide Selection.”

- Import the Skyrim skeleton. To do this, click the File menu and select the “Import…” option. In the dialog box that appears, set “Files of type” to “Netimmerse/Gamebryo (*.NIF, *.KF).” Navigate to the folder where you saved your edited skeleton file and click its name. Click the Open button.

In the dialog box that appears, click the Import button.

Repeat this step for the torso, boots, and gauntlets.

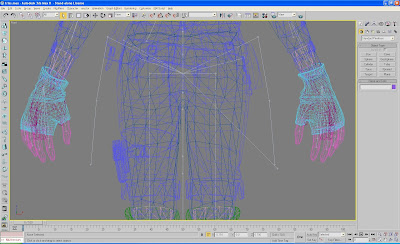
It looks as if importing the Skyrim meshes has caused the NWN2 models to disappear. Actually, they are still there, but they are so small that they can hardly be seen.

- We are about to scale the armor to make it the same size as its NWN2 counterpart. Select the Left or Right viewport to activate it. This will give us a side view of the model.

Press [H] to bring up the “Select Objects” dialog box. Select the root bone of the Skyrim skeleton, which in our case is named “skeleton_female.nif,” then click the Select button.

- Click the Transform Type-In button if it is not currently in Offset Mode.

- Click the Select and Uniform Scale tool.

In the input box for the X coordinate, enter the number to properly scale the armor to match the size of the NWN2 armor. Through trial and error, I’ve determined that for the Triss armor, this number is 1.56. Note that other Skyrim armor may require different values.

- We will now re-position the Skyrim armor. Click the Select and Move tool.

Move the Skyrim root bone until the armor is standing below the NWN2 head. It helps to be in wireframe mode while doing this. (You can toggle between wireframe mode and smooth + highlights mode by pressing [F3] on your keyboard.) You may not be able to match the position exactly, but try to get it in as closely as you can.

- We’ll need to temporarily hide the NWN2 body to make sure that the Skyrim armor is properly positioned. To do this, press [H] and select the NWN2 body, boots, and gloves in the dialog box. Click the Select button.

On the viewport, click the right mouse button and click “Hide Selection” in the context-sensitive menu. This will hide all the NWN2 meshes except the head and eyes.

- Zoom in so you can get a good view of the head and neck.

Unless you were incredibly lucky when positioning the Skyrim meshes, you may find that the Skyrim neck does not quite match the position of the NWN2 neck. If so, select the Skyrim skeleton and reposition it until you have a very close if not an exact match.

- We are about to match the pose of the Skyrim model to that of the NWN2 model, but first, we must “un-hide” the NWN2 meshes of the body, gloves, and boots. Right-click anywhere on the viewport to bring up a context-sensitive menu then click “Unhide by Name.”

In the “Unhide Objects” dialog box, select the main meshes of the NWN2 body, boots, and gloves then click the Unhide button. This will cause the dialog box to close and the selected objects to appear.

- Now we will pose the Skyrim model, which should match the pose of the NWN2 model as closely as possible. The whole process really isn’t difficult, but it does require some attention to detail, and we may have to go through several cycles before we get the pose right. The following is an example of how to pose the model.
First, we press [H] to bring up the “Select Objects” dialog box and choose a bone to rotate. (In this example, I picked the bone of the right upper arm, which is named “NPC R UpperArm.”) After clicking the bone that we want to move, hit the Select button.

Next, we choose a viewport to work on. For this bone, I chose the Front viewport initially. Now toggle on the Select and Rotate tool.

Click and drag the circle surrounding the joint of the right upper arm to rotate it. When you’re satisfied with the rotation of the bone, take note of its degree of rotation as shown in the Transform Type-In at the bottom of the screen. Take note also of the rotated coordinate (X, Y, or Z).

We now select the corresponding bone on the opposite side of the body. In this example, that would be the bone of the left upper arm, which is named “NPC L UpperArm.”

Instead of clicking and dragging the rotation tool, we will enter an exact value in the Transform Type-In. Make sure that the Transform Type-In is in Offset Mode. If you've been following this tutorial to the letter, it should still be toggled on. In the same coordinate (X, Y, or Z) that was changed before, enter the degree of rotation that we noted earlier, but change the sign to its opposite value. In other words, if the degree of rotation was positive when we rotated the bone on the other side of the body, enter a negative value for the bone we are now rotating. In our example, the degree of rotation of the right upper arm was a negative value, so for the left upper arm, we enter a positive value.

We now switch to the left viewport to change the pose of both upper arms as seen from the side. When using the mouse to rotate one of the upper arms, again take note of the degree of rotation. When we rotate the opposite upper arm using the Transform type-In, we will enter the same value that we noted earlier. Do not change the sign of the value this time. In the example below, the left and right upper arms are both rotated at the Z-axis by -6.02 degrees.

Continue in this manner with other bones until the legs, arms, hands, and feet are properly posed. Despite the bewildering number of bones in the Skyrim skeleton, we only need to rotate a few of them at this stage. These are the bones of the upper arms, shoulders (“NPC L Clavicle” and “NPC R Clavicle”), forearms (“NPC L Forearm” and “NPC R Forearm”), thighs (“NPC L Thigh” and “NPC R Thigh”), calves (“NPC L Calf” and “NPC R Calf”), hands (“NPC L Hand” and “NPC R Hand”), and feet (“NPC L Foot” and “NPC R Foot”). You will have to switch viewports as you go along, and you may switch between Wireframe mode and Smooth+Highlights mode as you see fit. For example, to rotate the feet, I chose to work in the Bottom viewport in Smooth+Highlights mode.

- At some point, you will notice that the Skyrim hands are huge compared to their NWN2 counterparts. Not as obvious is the fact that Skyrim forearms are slightly longer than NWN2 forearms.
To remedy this, we will scale down the bones of the forearms and hands. Shrinking a forearm bone will also shrink the hand bone connecting to it by a proportionate amount. Likewise, shrinking a hand bone will automatically shrink its finger bones proportionally.
For the Triss armor, I selected the bone of each hand in turn and scaled them down by the same degree using the Select and Uniform Scale tool. It was then that I realized that the forearms were too long. (Like I said, it wasn’t obvious at first.) I scaled down the forearm bones a bit, which caused the hands to shrink as well, so I had to scale the hand bones up.

It isn’t enough to scale the hands. Some of the finger bones have to be individually re-sized as well. This has to be done while also rotating the bones of the hands and fingers because it is only by changing their pose that the need to adjust their scale becomes apparent. It took me a number of cycles of scaling and rotating before I was satisfied with the result. Without a doubt, this is the most painstaking part of posing the Skyrim figure, but no matter how hard you try, the result cannot be perfect. The picture below shows how the colored Skyrim mesh aligns with the white NWN2 mesh.

- At this point, all the Skyrim meshes should be properly posed, more or less. Before we can rig them to the NWN2 skeleton, we will have to preserve that pose and disengage the meshes from the Skyrim skeleton. First, click the Select Object tool.

Press [H] to bring up the “Select Objects” dialog box. Under “List Types,” un-tick the check boxes labeled “Cameras” and “Bone Objects” so that only the meshes will appear in the list box. Click on the name of the Skyrim torso mesh then click the Select button. (In the case of the Triss armor, the name of this mesh is “outfit.”)

Click the Modify tab on the right panel. Right-click any of the modifiers under the Modifier List and select “Collapse All” from the context-sensitive menu. A message will appear, warning you that all modifiers will be removed and asking if you want to continue. Click the Yes button. When you’ve done this, only “Editable Mesh” should remain in the Modifier List.

Repeat this step for all the other Skyrim meshes. Do not do this for the NWN2 meshes, however.
- We’re going to delete all the Skyrim bones and cameras because we won’t need them anymore. Press [H] to bring up the “Select Objects” dialog box. Under “List Types,” click the Invert button to un-tick all the check boxes except the ones labeled “Cameras” and “Bone Objects.” Click the “All” button to highlight all the objects in the list. Click the Select button to close the dialog box and select all the highlighted objects then press the Delete key to delete all the selected bones.

- We need to make sure that there are no open edges anywhere in the mesh. You may want to hide the NWN2 meshes before proceeding.
Select the torso mesh again. Under the Selection rollout of the Modify panel, click the Vertex button, which looks like three red dots arranged like the corners of a triangle. Press [Ctrl]+A to select all vertices of the mesh. Under the Weld rollout, type 0.001 in the input box beside the Selected button then click that button. Depending on your screen resolution, you may have to scroll down the panel to see it. When done, click the Vertex button again to exit Vertex sub-mode.

Repeat this step for each of the other Skyrim meshes. - If the edges of the Skyrim meshes look too sharp, you may have to smoothen them. In the picture below, the edges are visibly sharp on the arms, right thigh, and left boot. We will have to smoothen all the meshes to be on the safe side.

Let us start by selecting the torso mesh, which, in the case of the Triss armor, is named “outfit.” In the Modify panel, click the Polygon button, which looks like a red square. This will enable Polygon sub-mode on the model.

Press [Ctrl]+A to select all the polygons in the mesh. Scroll down the Modify panel until you see a frame labeled “Smoothing Groups.” Click the “Clear All” button followed by the “Auto Smooth” button. This will make the mesh look smoother than it really is. Scroll all the way up the Modify panel and click the Polygon button again to toggle off Polygon sub-mode. Repeat this step for all the other Skyrim meshes.

- In case you haven’t been saving your work, now is as good a time as any to do so.


Conclusion
At this juncture, we have managed to import Skyrim armor to 3DS Max. We have also scaled it and re-positioned it for eventual export as an MDB file. The whole process has been straightforward thus far. Nevertheless, the armor isn’t textured or rigged yet. We also need to replace the parts that show skin with an NWN2 nude base. I will show how to to do these on the next installment of this tutorial.Update, 17 September 2012. As I’ve explained in my next blog post, I’m retiring from NWN2 modding. It’s highly unlikely that I will ever finish this tutorial, although my other tutorials on 3D modeling contain enough information to move forward. It’s lame, I know, especially as the required information is scattered over several blog posts. I apologize, but I just don’t have the heart to go on.


Comments
Actually, I realized shortly after I had posted this tutorial a few weeks back that there was an error in my workflow. Within a couple of hours after publishing it, I reverted my original blog post to draft.
It took me some weeks to correct the error because I made the mistake of checking out Skyrim for the first time. Let's just say that my time in Skyrim was fun but unproductive.
It's certainly confirmed that this is something out of my abilities.
Glad there is somebody like you who can do it though! :)
Lance.
I attempted to follow your tutorial regarding the conversion from Skyrim armor to NwN2, but failed at the 15th step, because 3dsMax didn't import any collision spheres (with animations, static objects are still working). Perhaps you know what is causing this mistake.
The tutorial I mentioned before:
http://nwn2faithless.blogspot.de/2012/07/converting-skyrim-armor-to-nwn2-part-1.html
I am using 3dsMax 2009 with the following plugins:
niftools-max-plugins-3.4.2.4632
nwn2utilsmaxplugins2.3.1
The version of tazpn's plugin that you are using is new, having been uploaded only 5 months ago. The last time I installed tazpn's plugin was on 2008. If you're having problems importing the collision spheres and skeleton from the NWN2 model, the problem would be with tazpn's plugin. Unfortunately, my plugin is for a much older version of 3DS Max and won't work with Max 2009. My only advice is to report the error in tazpn's plugin page and hope that he will respond.
tazpn does'nt develop his Plugin anymore since 2008, so that's why I want to ask you:
Could you make your Plugin available for downloading?
I have also a Version 8 from 3DS.
Version 1.17
Version 2.0.1
The above are links to the two versions of tazpn's plugin that I have. Both will work on 3DS Max 8. Try the later version first, and if that doesn't work, try the earlier one.
I don't think we have any gmax or Blender plugins for converting models to NWN2's file format. That's why my NWN2 model tutorials revolve around 3DS Max.