Posts

Behold a Pale Horse, Part 3

Image
I've been working hard on this "horse" model, grabbing what little free time I have just to finish it. The rig isn't perfect, but the model will need only a few tweaks here and there to be done. I lack sleep and can hardly write coherently, so I'll let my screenshots do all the talking. Together, they should be worth a couple of thousand words, more or less.

Behold a Pale Horse, Part 2

Image
I’ve finally added barding to the creature that I showcased in my last blog post. With armor on, this model looks a lot more like a horse than a greyhound sort of thingy. Much of the detail work that I did on the creature’s body is now lost under its barding. I don’t know if this monster looks scarier naked or armored. I’m tempted to have both versions of the creature in the module, but I don’t know if the monster in the buff has a place in the story. We shall see. My next blog post will feature a playable version of this creature. I hope it won’t take me long to create so I can move on to my next 3D model.

Behold a Pale Horse, Part 1

Image
I can’t seem to get myself out of creature modeling. I tried making a placeable object for the first time and wound up turning it into a creature. Currently, I’m building critters of the four-legged variety once again. The concept sketch shown on the right is of a horse. At least I think it’s a horse. It’s either that or a really large, armored greyhound. Let’s call it a horse for now. Anyway, this is what’s been keeping me busy lately. (That and a certain video game babe that I’ve been modeling on and off.) The screenshot shown on the left is of my current work in progress with the high-poly horse model. I’m supposed to give this creature barding, which I will add later. I felt that its present appearance is interesting enough to blog about, which is why I’m posting this picture here. More to come in my next blog post.

Super-Simple Skeleton Building and Animation Tutorial

Image
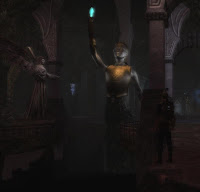
Author's Note, 29 May 2012: Looking for an animation tutorial? This one is next to useless. It was intended to show how statues can be made into enemy creatures without having them move. For a full-blown animation tutorial, check out my blog post here . In my last blog post, I showcased my latest 3D model, a statue of an elven warrior. It’s perfectly fine as a placeable, but Dirtywick wanted me to make it a creature. The statue is supposed to be some kind of magical defense against intruders, but there seem to be problems with trying to get placeables to be targeted by NPCs and to fire visual effects without resorting to a bunch of workarounds. Dirtywick wanted to keep things simple for the area designers on our team, which leaves me with the burden of providing a solution. In this particular case, one solution is for the statues to be implemented as creatures that can shoot spells from the crystals they are holding. None of the existing skeletons and animations in NWN2 is suita...

My First Placeable Model

Image
I assume that most people who try to learn 3D modeling start with something inanimate such as a box. My first 3D model, on the other hand, was a monster. I could never focus my attention on anything as banal as a box, so I jumped right into creature modeling. Took me over a month to figure out. For Shattered Dreams, Dirtywick told me that he needed a custom model – something like a tripod, a little taller than a human, topped with a crystal. Since all the other 3D artists on the project were still busy with their current assignments, I decided to try making my very first placeable. Looking for picture references on which to base my design, I searched the Internet for tripods, preferably those that looked arcane, but the ones I found were either too plain or too modern. I eventually decided to search for candleholders because some of them can be pretty fancy, and their design can conceivably be tweaked for holding crystals instead. It didn’t take me long to find some beautiful ones. The...

Reconstructing Arizona

Image
A few of the areas in Shattered Dreams were inspired by the Arizona desert, of which we gathered several photo references. Anduraga was not happy with the cliff textures that come with the game, so he requested that some new ones be done based on the Grand Canyon. I took a break from 3D modeling to try my hand at creating terrain textures. It wasn’t easy for me to find information on the image files that comprise them, so Dirtywick passed me information that he found at the Rogue Dao website . When I was done, I quickly assembled a test module to see how my cliff textures look in the game. I rather like the way the textures turned out. I created two cliff textures that can actually be used together fairly seamlessly even at 100% pressure. The landscape shown here won’t appear in Shattered Dreams, by the way. This area is strictly for testing purposes. Besides, this place is decidedly less grand than the canyon that inspired it. Hopefully, our area designers can make better use of the t...

Rusty Metal: A 3D Modeling Tutorial

Image
In my last blog post, I showcased a creature model wearing rusty metal armor. In the process of texturing the model, I figured out a few techniques for achieving the surface look that I wanted. In this blog post, I explain the process of creating the rusty metal look. This tutorial assumes that you have the following software: An image editor that can handle layers and channels such as Photoshop or Gimp as well as a plugin for converting image files to normal maps. I use Photoshop, but the operations explained here can also be done in Gimp, albeit with different commands. 3D Modeling software that can import and export MDB files such as 3DS Max with Tazpn’s MDB plugin The tutorial also assumes that you already know the basics of normal and diffuse mapping and that the model you’re working on already has a UV map in place. The tutorial also assumes that you know how to use your software. I won’t explain how to create alpha channels or how to set overlay layers. When you’re ready, do the...